|
Comment citer 1. Pour la citation dans le texte (Matériel & Méthodes) : 2. Pour le tableau des ressources clés : |
||
|
Numéro vert : (877) 796-6397 -- États-Unis et Canada uniquement -- |
Fax : +1-832-582-8590 Commandes : +1-832-582-8158 |
Support technique : +1-832-582-8158 Ext:3 Veuillez indiquer votre numéro de commande dans le-mail. Nous nous efforçons de répondre à toutes les demandes par e-mail dans un délai dun jour ouvrable. |
Description biologique
| Spécificité | Phospho-S6 Ribosomal Protein (S235/236) Antibody [H18E15] détecte les niveaux endogènes de S6 Ribosomal Protein uniquement lorsqu'il est phosphorylé sur Ser235/236. |
|---|---|
| Contexte | Phospho-S6 Ribosomal Protein (Ser235/236) est la forme phosphorylée de la protéine ribosomique S6 (RPS6), une protéine de 249 acides aminés (~28,6 kDa) et un composant essentiel de la petite sous-unité ribosomique 40S au sein de la famille S6E. RPS6 joue un rôle central dans la régulation de la synthèse protéique et de la croissance cellulaire, la phosphorylation se produisant principalement au niveau des résidus sérine 235 et 236 dans sa région carboxy-terminale. Ces sites sont parmi les plus précocement et les plus fortement modifiés en réponse à des stimuli externes et sont phosphorylés principalement par les kinases p70/p85 S6 (S6K1/2) en aval de la voie mTORC1, ainsi que par RSK, PKA et PKC. La phosphorylation au niveau de Ser235/236 module la fonction ribosomique et affine le contrôle traductionnel en réponse aux facteurs de croissance, aux nutriments et au stress cellulaire, contribuant à une augmentation de la traduction globale, à la régulation de la taille cellulaire et à la progression du cycle cellulaire. Phospho-S6 (Ser235/236) sert de biomarqueur largement utilisé de l'activation de la voie PI3K/Akt/mTOR dans divers contextes physiologiques et pathologiques, y compris la prolifération cancéreuse, le contrôle métabolique et la fonction neuronale. La dérégulation de la phosphorylation de RPS6 ou de ses voies en amont est impliquée dans diverses maladies telles que le cancer, le diabète et la neurodégénérescence. |
Informations dutilisation
| Application | WB, IF, FCM | Dilution |
|
||||||
|---|---|---|---|---|---|---|---|---|---|
| Réactivité | Human, Mouse, Rat, Monkey | ||||||||
| Source | Rabbit Monoclonal Antibody | MW | 32 kDa | ||||||
| Tampon de stockage | PBS, pH 7.2+50% Glycerol+0.05% BSA+0.01% NaN3 | Stockage (À partir de la date de réception) |
-20°C (avoid freeze-thaw cycles), 2 years | ||||||
| IF |
Experimental Protocol:
Specimen Preparation
1. Aspirate liquid, then cover cells to a depth of 2–3 mm with 4% Paraformaldehyde diluted in 1X PBS.
NOTE: Paraformaldehyde is toxic, use only in a fume hood.
2. Fix cells for 15 min at room temperature.
3. Aspirate fixative, rinse three times in 1X PBS for 5 min each.
4. Proceed with Immunostaining.
Immunostaining
1. Add theblocking buffer and incubate for 60 min at RT.
2. Prepare primary antibody diluent in antibody dilution buffer as recommended .
3. Aspirate blocking solution, apply diluted primary antibody.
4. Incubate overnight at 4°C.
5. Rinse three times in 1X PBS for 5 min each.
6. Incubate specimens in fluorochrome-conjugated secondary antibody diluted in antibody dilution buffer for 1–2 hr at room temperature in the dark.
7. Rinse three times in 1X PBS for 5 min each.
8. Mount slides usingmounting medium with DAPI and cover with coverslips.
9. For best results, allow mountant to cure overnight at room temperature. For long-term storage, store slides flat at 23°C protected from light.
|
| WB |
Experimental Protocol:
Sample preparation
1. Tissue: Lyse the tissue sample by adding an appropriate volume of ice-cold RIPA/NP-40 Lysis Buffer (containing Protease Inhibitor Cocktail, Phosphatase Inhibitor Cocktail),and homogenize the tissue at a low temperature. 2. Adherent cell: Aspirate the culture medium and wash the cells with ice-cold PBS twice. Lyse the cells by adding an appropriate volume of RIPA/NP-40 Lysis Buffer (containing Protease Inhibitor Cocktail, Phosphatase Inhibitor Cocktail) and put the sample on ice for 5 min. 3. Suspension cell: Transfer the culture medium to a pre-cooled centrifuge tube. Centrifuge and aspirate the supernatant. Wash the cells with ice-cold PBS twice. Lyse the cells by adding an appropriate volume of RIPA/NP-40 Lysis Buffer (containing Protease Inhibitor Cocktail, Phosphatase Inhibitor Cocktail) and put the sample on ice for 5 min. 4. Place the lysate into a pre-cooled microcentrifuge tube. Centrifuge at 4°C for 15 min. Collect the supernatant;
5. Remove a small volume of lysate to determine the protein concentration;
6. Combine the lysate with protein loading buffer. Boil 20 µL sample under 95-100°C for 5 min. Centrifuge for 5 min after cool down on ice.
Electrophoretic separation
1. According to the concentration of extracted protein, load appropriate amount of protein sample and marker onto SDS-PAGE gels for electrophoresis. Recommended separating gel (lower gel) concentration: 10%. Reference Table for Selecting SDS-PAGE Separation Gel Concentrations 2. Power up 80V for 30 minutes. Then the power supply is adjusted (110 V~150 V), the Marker is observed, and the electrophoresis can be stopped when the indicator band of the predyed protein Marker where the protein is located is properly separated. (Note that the current should not be too large when electrophoresis, too large current (more than 150 mA) will cause the temperature to rise, affecting the result of running glue. If high currents cannot be avoided, an ice bath can be used to cool the bath.)
Transfer membrane
1. Take out the converter, soak the clip and consumables in the pre-cooled converter;
2. Activate PVDF membrane with methanol for 1 min and rinse with transfer buffer;
3. Install it in the order of "black edge of clip - sponge - filter paper - filter paper - glue -PVDF membrane - filter paper - filter paper - sponge - white edge of clip"; 4. The protein was electrotransferred to PVDF membrane. ( 0.45 µm PVDF membrane is recommended ) Reference Table for Selecting PVDF Membrane Pore Size Specifications Recommended conditions for wet transfer: 200 mA, 60 min. ( Note that the transfer conditions can be adjusted according to the protein size. For high-molecular-weight proteins, a higher current and longer transfer time are recommended. However, ensure that the transfer tank remains at a low temperature to prevent gel melting.)
Block
1. After electrotransfer, wash the film with TBST at room temperature for 5 minutes;
2. Incubate the film in the blocking solution ( recommending 5% BSA solution)
for 1 hour at room temperature;
3. Wash the film with TBST for 3 times, 5 minutes each time.
Antibody incubation
1. Use 5% skim milk powder to prepare the primary antibody working liquid (recommended dilution ratio for primary antibody 1:1000), gently shake and incubate with the film at 4°C overnight; 2. Wash the film with TBST 3 times, 5 minutes each time;
3. Add the secondary antibody to the blocking solution and incubate with the film gently at room temperature for 1 hour;
4. After incubation, wash the film with TBST 3 times for 5 minutes each time.
Antibody staining
1. Add the prepared ECL luminescent substrate (or select other color developing substrate according to the second antibody) and mix evenly;
2. Incubate with the film for 1 minute, remove excess substrate (keep the film moist), wrap with plastic film, and expose in the imaging system.
|
| IF |
Experimental Protocol:
Sample Preparation
1. Adherent Cells: Place a clean, sterile coverslip in a culture dish. Once the cells grow to near confluence as a monolayer, remove the coverslip for further use.
2. Suspension Cells: Seed the cells onto a clean, sterile slide coated with poly-L-lysine.
3. Frozen Sections: Allow the slide to thaw at room temperature. Wash it with pure water or PBS for 2 times, 3 minutes each time.
4. Paraffin Sections: Deparaffinization and rehydration. Wash the slide with pure water or PBS for 3 times, 3 minutes each time. Then perform antigen retrieval.
Fixation
1. Fix the cell coverslips/spots or tissue sections at room temperature using a fixative such as 4% paraformaldehyde (4% PFA) for 10-15 minutes.
2. Wash the sample with PBS for 3 times, 3 minutes each time.
Permeabilization
1.Add a detergent such as 0.1–0.3% Triton X-100 to the sample and incubate at room temperature for 10–20 minutes.
(Note: This step is only required for intracellular antigens. For antigens expressed on the cell membrane, this step is unnecessary.)
Wash the sample with PBS for 3 times, 3 minutes each time.
Blocking
Add blocking solution and incubate at room temperature for at least 1 hour. (Common blocking solutions include: serum from the same source as the secondary antibody, BSA, or goat serum.)
Note: Ensure the sample remains moist during and after the blocking step to prevent drying, which can lead to high background.
Immunofluorescence Staining (Day 1)
1. Remove the blocking solution and add the diluted primary antibody.
2. Incubate the sample in a humidified chamber at 4°C overnight.
Immunofluorescence Staining (Day 2)
1. Remove the primary antibody and wash with PBST for 3 times, 5 minutes each time.
2. Add the diluted fluorescent secondary antibody and incubate in the dark at 4°C for 1–2 hours.
3. Remove the secondary antibody and wash with PBST for 3 times, 5 minutes each time.
4. Add diluted DAPI and incubate at room temperature in the dark for 5–10 minutes.
5. Wash with PBST for 3 times, 5 minutes each time.
Mounting
1. Mount the sample with an anti-fade mounting medium.
2. Allow the slide to dry at room temperature overnight in the dark.
3. Store the slide in a slide storage box at 4°C, protected from light.
|
Références
|
Données dapplication
IF
Validé par Selleck
-
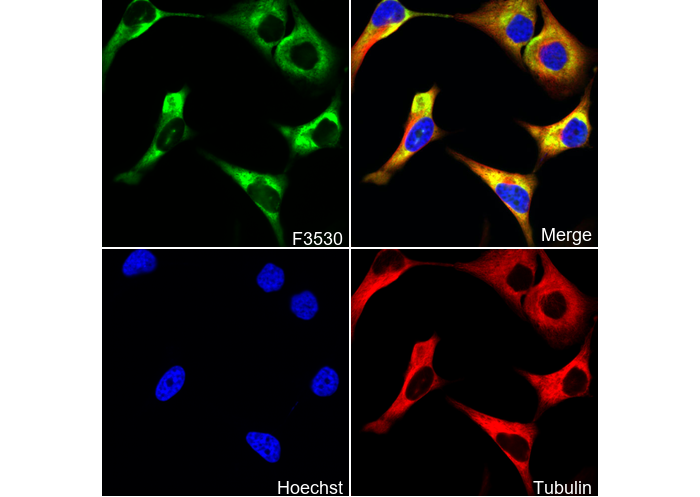 Immunofluorescent analysis of Hela cells using F3530 (green, 1:100), Hoechst (blue) and tubulin (Red).
WB
Validé par Selleck
-
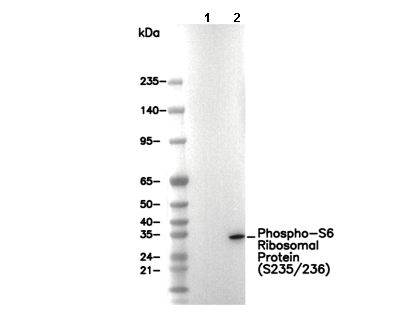 Lane 1: NIH/3T3, Lane 2: NIH/3T3 (PDGF, 100 ng/ml, 20 min)