|
Hoe te citeren 1. Voor in-tekst citatie (materialen en methoden): 2. Voor de tabel met belangrijke bronnen: |
||
|
Gratis nummer: (877) 796-6397 -- Alleen VS en Canada -- |
Fax: +1-832-582-8590 Bestellingen: +1-832-582-8158 |
Technische ondersteuning: +1-832-582-8158 Ext:3 Gelieve uw bestelnummer in de e-mail te vermelden. Wij streven ernaar alle e-mailvragen binnen één werkdag te beantwoorden. |
Biologische Beschrijving
| Specificiteit | CDKN2A/p16INK4A + CDKN2B/p15INK4B Antibody [C7F9] detecteert endogene niveaus van CDKN2A/p16INK4A + CDKN2B/p15INK4B-eiwit. |
|---|---|
| Achtergrond | CDKN2A maakt deel uit van een genfamilie die structureel verwante inhibitoren van cycline-afhankelijke kinasen (CDK's) codeert, die een cruciale rol spelen bij het reguleren van de G1/S-fase overgang van de Cell Cycle. Het CDKN2A-gen produceert het p16INK4A-eiwit, een regulator die de activiteit van CDK4 en CDK6 remt om deze faseovergang te controleren. Gelegen op menselijk chromosoom 9p21.3, codeert het CDKN2B-gen voor p15INK4B, een andere CDK-inhibitor die specifiek gericht is op CDK4 en CDK6. Samen met CDKN2A, dat ook p14ARF en p16INK4A codeert via alternatief exongebruik, reguleren deze eiwitten de Cell Cycle progressie via de p53- en pRb-routes. Deze drie CDK-inhibitoren—p15INK4B, p16INK4A en p14ARF— zijn in tandem georganiseerd op het 9p21.3-locus en vormen een kritiek tumorsuppressorcluster. Dit gebied wordt frequent verwijderd of epigenetisch gesilenced tijdens vroege tumorigenese, zoals waargenomen bij primaire celimmortalisatie, precancereuze laesies en diverse kankers. De individuele inhibitoren kunnen worden gedownreguleerd via distincte mechanismen, zoals promoter-specifieke methylatie, cis-werkende lange niet-coderende antisense RNA's, of divergente upstream-signalen. Bijvoorbeeld, p15INK4B-expressie kan worden onderdrukt door transformerende groeifactor-bèta (TGF-β)-signalering. Opmerkelijk is dat p15INK4B een pivotale tumor-onderdrukkende rol aanneemt wanneer p16INK4A afwezig is. De effectiviteit ervan bij het inhiberen van tumorgroei is gekoppeld aan de sterke interactie met en inhibitie van CDK4 en CDK6 via belangrijke N-terminale residuen. Daarnaast inhibeert p15INK4B enolase-1, een glycolytisch enzym dat frequent wordt upregulated in kanker. Zowel CDKN2A als CDKN2B zijn goed-gevestigde tumorsuppressorgenen en zijn gewoonlijk gealtereerd in talrijke menselijke maligniteiten, wat hun kritieke rol bij het handhaven van cellulaire homeostase en het voorkomen van tumorprogressie benadrukt. |
Gebruiksinformatie
| Toepassing | WB, IF, FCM | Verdunning |
|
||||||
|---|---|---|---|---|---|---|---|---|---|
| Reactiviteit | Human | ||||||||
| Bron | Rabbit Monoclonal Antibody | MW | 17 kDa | ||||||
| Opslagbuffer | PBS, pH 7.2+50% Glycerol+0.05% BSA+0.01% NaN₃ | Opslag (Vanaf de datum van ontvangst) |
-20°C (avoid freeze-thaw cycles), 2 years | ||||||
| WB |
Experimental Protocol:
Sample preparation
1. Tissue: Lyse the tissue sample by adding an appropriate volume of ice-cold RIPA/NP-40 Lysis Buffer (containing Protease Inhibitor Cocktail),and homogenize the tissue at a low temperature or lyse it by sonication on ice, then incubate on ice for 30 minutes. 2. Adherent cell: Aspirate the culture medium and transfer the cells into an EP tube. Wash the cells with ice-cold PBS twice. Add an appropriate volume of RIPA/NP-40 Lysis Buffer (containing Protease Inhibitor Cocktail), sonicate to lyse the cells, and incubate on ice for 30 minutes. 3. Suspension cell: Transfer the culture medium to a pre-cooled centrifuge tube. Centrifuge and aspirate the supernatant. Wash the cells with ice-cold PBS twice.Add an appropriate volume of RIPA/NP-40 Lysis Buffer (containing Protease Inhibitor Cocktail), sonicate to lyse the cells, and incubate on ice for 30 minutes. 4. Place the lysate into a pre-cooled microcentrifuge tube. Centrifuge at 4°C for 15 min. Collect the supernatant;
5. Remove a small volume of lysate to determine the protein concentration;
6. Combine the lysate with protein loading buffer. Boil 20 µL sample under 95-100°C for 5 min. Centrifuge for 5 min after cool down on ice.
Electrophoretic separation
1. According to the concentration of extracted protein, load appropriate amount of protein sample and marker onto SDS-PAGE gels for electrophoresis. Recommended separating gel (lower gel) concentration: 10%. Reference Table for Selecting SDS-PAGE Separation Gel Concentrations 2. Power up 80V for 30 minutes. Then the power supply is adjusted (110 V~150 V), the Marker is observed, and the electrophoresis can be stopped when the indicator band of the predyed protein Marker where the protein is located is properly separated. (Note that the current should not be too large when electrophoresis, too large current (more than 150 mA) will cause the temperature to rise, affecting the result of running glue. If high currents cannot be avoided, an ice bath can be used to cool the bath.)
Transfer membrane
1. Take out the converter, soak the clip and consumables in the pre-cooled converter;
2. Activate PVDF membrane with methanol for 1 min and rinse with transfer buffer;
3. Install it in the order of "black edge of clip - sponge - filter paper - filter paper - glue -PVDF membrane - filter paper - filter paper - sponge - white edge of clip"; 4. The protein was electrotransferred to PVDF membrane. ( 0.22 µm PVDF membrane is recommended )) Reference Table for Selecting PVDF Membrane Pore Size Specifications Recommended conditions for wet transfer: 200 mA, 60 min. ( Note that the transfer conditions can be adjusted according to the protein size. For high-molecular-weight proteins, a higher current and longer transfer time are recommended. However, ensure that the transfer tank remains at a low temperature to prevent gel melting.)
Block
1. After electrotransfer, wash the film with TBST at room temperature for 5 minutes;
2. Incubate the film in the blocking solution for 1 hour at room temperature;
3. Wash the film with TBST for 3 times, 5 minutes each time.
Antibody incubation
1. Use 5% skim milk powder to prepare the primary antibody working liquid (recommended dilution ratio for primary antibody 1:2000), gently shake and incubate with the film at 4°C overnight; 2. Wash the film with TBST 3 times, 5 minutes each time;
3. Add the secondary antibody to the blocking solution and incubate with the film gently at room temperature for 1 hour;
4. After incubation, wash the film with TBST 3 times for 5 minutes each time.
Antibody staining
1246. Add the prepared ECL luminescent substrate (or select other color developing substrate according to the second antibody) and mix evenly;
2. Incubate with the film for 1 minute, remove excess substrate (keep the film moist), wrap with plastic film, and expose in the imaging system. (Exposure time of at least 60s is recommended)
|
| IF |
Experimental Protocol:
Sample Preparation
1. Adherent Cells: Place a clean, sterile coverslip in a culture dish. Once the cells grow to near confluence as a monolayer, remove the coverslip for further use.
2. Suspension Cells: Seed the cells onto a clean, sterile slide coated with poly-L-lysine.
3. Frozen Sections: Allow the slide to thaw at room temperature. Wash it with pure water or PBS for 2 times, 3 minutes each time.
4. Paraffin Sections: Deparaffinization and rehydration. Wash the slide with pure water or PBS for 3 times, 3 minutes each time. Then perform antigen retrieval.
Fixation
1. Fix the cell coverslips/spots or tissue sections at room temperature using a fixative such as 4% paraformaldehyde (4% PFA) for 10-15 minutes.
2. Wash the sample with PBS for 3 times, 3 minutes each time.
Permeabilization
1.Add a detergent such as 0.1–0.3% Triton X-100 to the sample and incubate at room temperature for 10–20 minutes.
(Note: This step is only required for intracellular antigens. For antigens expressed on the cell membrane, this step is unnecessary.)
Wash the sample with PBS for 3 times, 3 minutes each time.
Blocking
Add blocking solution and incubate at room temperature for at least 1 hour. (Common blocking solutions include: serum from the same source as the secondary antibody, BSA, or goat serum.)
Note: Ensure the sample remains moist during and after the blocking step to prevent drying, which can lead to high background.
Immunofluorescence Staining (Day 1)
1. Remove the blocking solution and add the diluted primary antibody.
2. Incubate the sample in a humidified chamber at 4°C overnight.
Immunofluorescence Staining (Day 2)
1. Remove the primary antibody and wash with PBST for 3 times, 5 minutes each time.
2. Add the diluted fluorescent secondary antibody and incubate in the dark at 4°C for 1–2 hours.
3. Remove the secondary antibody and wash with PBST for 3 times, 5 minutes each time.
4. Add diluted DAPI and incubate at room temperature in the dark for 5–10 minutes.
5. Wash with PBST for 3 times, 5 minutes each time.
Mounting
1. Mount the sample with an anti-fade mounting medium.
2. Allow the slide to dry at room temperature overnight in the dark.
3. Store the slide in a slide storage box at 4°C, protected from light.
|
Referenties
|
Toepassingsgegevens
WB
Gevalideerd door Selleck
-
 Lane 1: HeLa
Lane 2: 293
IF
Gevalideerd door Selleck
-
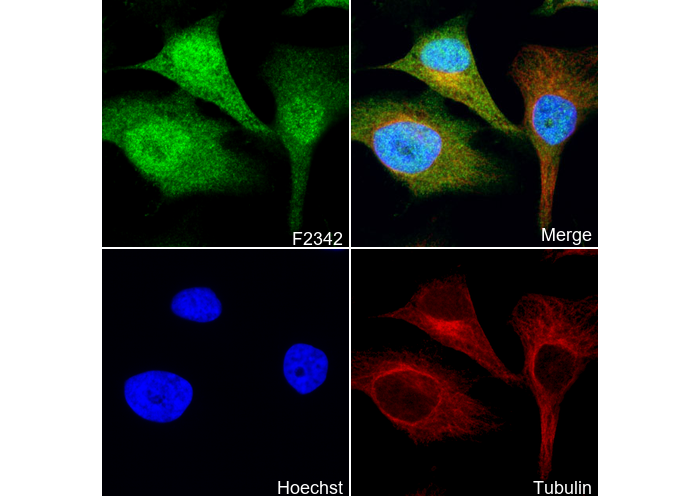 Immunofluorescent analysis of Hela cells using F2342 (green, 1:100), Hoechst (blue) and tubulin (Red).